
Tutorials

Crafting Love at Home: 3 Heartwarming Valentine's Decor Ideas with Fusion Mineral Paint and Iron Orchid Designs

Unlocking the Secrets of Decoupage: Everything You Need to Know
Decoupage is a centuries-old craft that involves decorating objects by gluing paper cutouts onto them and then sealing them with layers of varnish or adhesive. One popular and versatile paper used for decoupage is Mint by Michelle paper. When combined with Fusion Decoupage Gel, it allows for stunning creations that can be applied to furniture and used to make unique home decor items. In this blog post, we will explore the art of decoupage using Mint by Michelle paper and Fusion Decoupage Gel, as well as delve into the fascinating history of this timeless craft.

What is Decoupage?
Decoupage originated in East Siberia in the 12th century and has since spread across the globe, evolving into various styles and techniques. The word "decoupage" comes from the French word "decouper," which means "to cut out." It gained popularity during the Renaissance, when it was used to decorate furniture, household items, and even walls.
Transforming Furniture with Mint by Michelle Paper
Mint by Michelle paper offers a wide range of beautiful designs, from vintage patterns to modern motifs. When using Mint by Michelle paper for decoupage, it's important to choose a design that complements the furniture piece you're working on. Whether you're revamping an old dresser or adding a touch of elegance to a plain table, Mint by Michelle paper can breathe new life into your furniture.

Using Fusion Decoupage Gel
Fusion Decoupage Gel is a high-quality adhesive specifically formulated for decoupage projects. It provides a strong bond between the paper and the surface, ensuring longevity and durability. The gel is easy to apply, dries clear, and creates a smooth finish that enhances the beauty of the Mint by Michelle paper design.
Blending with Paint
One of the unique aspects of decoupage is the ability to blend the paper design seamlessly with the surrounding surface using paint. After applying the Mint by Michelle paper and Fusion Decoupage Gel, you can use acrylic or chalk paint to create a cohesive look. By carefully selecting colors that complement the paper design, you can achieve a harmonious and professional finish.
Creating Home Decor Items
Decoupage isn't limited to furniture alone. With Mint by Michelle paper and Fusion Decoupage Gel, you can create a wide range of home decor items, such as decorative trays, picture frames, vases, and more. Let your creativity soar as you transform ordinary objects into personalized works of art.
The History of Decoupage
As mentioned earlier, decoupage has a rich history that spans centuries. It gained popularity in Europe during the 17th and 18th centuries, with aristocrats and royalty using it to adorn their homes with intricate designs. In the 19th century, decoupage became a popular pastime for women, who would create beautiful objects using scraps of paper and varnish.
Today, decoupage continues to captivate artists and crafters alike. It allows for self-expression, creativity, and the opportunity to breathe new life into old or plain objects. With Mint by Michelle paper and Fusion Decoupage Gel, you can embark on your own decoupage journey and create stunning pieces that reflect your personal style.
So why not give decoupage a try? Explore the world of Mint by Michelle paper, experiment with Fusion Decoupage Gel, and let your imagination run wild. Transform your furniture, create unique home decor items, and become a part of the rich history of this timeless craft.

Fusion Mineral Paint how to's list!

Wander Dresser using Iron Orchid Designs products
This dresser was refinished with bright coral paint and all sorts of Iron Orchid Designs transfers, stamps, and inks.
Here is a list of what I used.( some items are discontinued,they will be noted with a *)
The paint is a mix of Coral colors I had around the workshop. The Coral from Fusion Mineral Paint would work too. Coral Fusion Mineral Paint
I added the wording with the Typesetting Stamp
The flowers are the Wander transfer
There are bits of handwriting from the Kindest Regards stamp. This stamp is a must have for your stash!
I used the trim area with diamond shapes from the Prim and Trim transfer *
I used Iron Orchid Designs Black, and China Blue Inks for the stamping and to put smudges of color on the drawers and here and there. TIP: When using the IOD inks let them dry a full 24 hours before brushing on top coat. I use a heat gun or blow dryer to make sure it's dry and set. Spray water based sealers like MinWax PolyCrylic work great to seal first and then let you brush or roll on a liquid sealer without smearing the ink.
I used an IOD brayer with a very light coat of IOD Mixing White ink and rolled it around to make highlighted areas.
The knobs were highlighted with Plaid Liquid Gold Leaf paint* but you can use Fusion Mineral Paint metallic paint in any of the gold shades, rose gold would be beautiful
I sealed it with a coat of Fusion Mineral Tough Coat in Matte finish. Lightly coated and let dry two to three times.
No two works are going to look the same so embrace what you like and change others. If you have any questions just email us at bluebirdmercantile@gmail.com

DIY Home Decor: Mixed Media Wall Art
It’s all about the layers!
You can create amazing wall art using multiple techniques layered in your piece - with the right instructions. But sometimes - a picture is worth a thousand words, truly.
No time to read this now? Pin it for later!
So I broke out two of the more complicated techniques I used to create a bright colored, floral word art piece for my gallery wall - and put them into a short video. You can watch that here, or scroll on by and catch the complete supply list and step-by-step instructions below.
HERE’S EVERYTHING YOU’LL NEED TO MAKE YOUR OWN MIXED MEDIA WALL ART
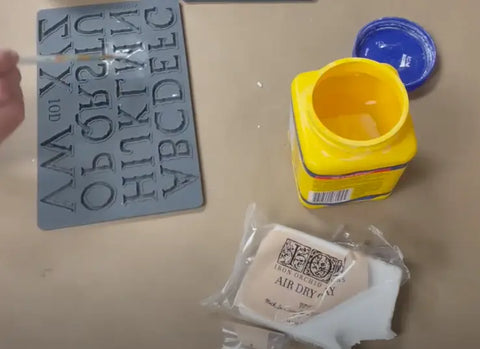
To create your own piece you’ll need:
Hawaiian Hibiscus Milk Paint by Fusion Paint
Heat gun
Plastic tool (PRO TIP: the plastic applicator from Painterly Floral Transfer)
Titebond Quick + Thick Glue
Even though the video tutorial walks you through two of the techniques used in making this mixed media wall art piece, let’s walk through your initial steps.

STEP 1: Paint the Gallery Wood Blank
Grab the paintbrush and the Hawaiian Hibiscus Milk Paint and prepare the paint according to the package instructions. Once it’s ready - give the wood blank a complete coverage with the paint and then let it dry completely.
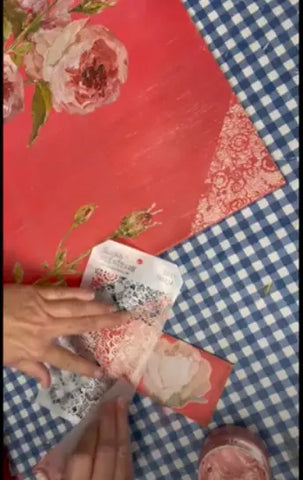
STEP 2: Add Painterly Floral Transfer
I picked some pieces from the transfer that would frame my art piece, creating a space for the words I’ll add later from IOD Mould castings.
This is where you open the door to your own creativity and choose the florals that call to you from the IOD Transfer. Take a look at my finished piece to see how I developed my composition by creating a floral frame with the transfer pieces I used.
One tip for applying a transfer to any project surface, you don’t need to rub-on the transfer using a lot of pressure. Try to “catch a bubble” on the transfer and lift off the backing a bit to peek. Replace the backing and rub-on any bits remaining on the backing.
Now let’s continue with the techniques in the video.
STEP 3: Cast The Letters For Your Word Art
Before you put any Air Dry Clay into your mould, take a paintbrush and brush in some cornstarch. This will help the casting release more easily from the mold. My favorite technique is to pop the mould into the freezer for 3-5 minutes. The castings pop out easily when they come out of the freezer.
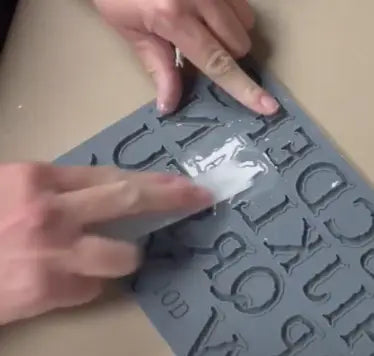
Now take a bit of clay from the package, then immediately put the open package of clay into a ziplock bag. It dries fast! And taking this extra step will preserve the rest of the clay - an economic tip!
Push the clay into the letter as you begin to spell out your words. This is not a difficult step in the process - it just takes time. And you need to take your time. There are so many tiny details in the mold and they’re delicate. Perform each step carefully and methodically.
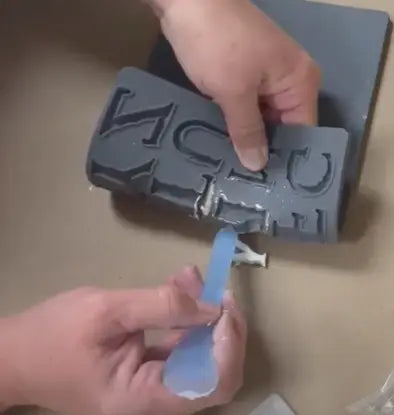
Once the clay has completely filled the letter, take a flat tool (I’m using the rub-on transfer plastic applicator from the Painterly Floral transfer) and scrape off the excess clay. A flat back on the casting will help it adhere when you apply the glue.
You’ll see the back of the silicone moulds have a micro rim around the edge of each impression. This helps get the excess clay off by using it as a guide. (min1:05 to see this illustrated in the video)
You can use a metal tool, like a putty knife, but be careful it doesn’t cut into the soft silicone mould. You can also run your finger around the micro rim to scrape off excess clay.
STEP 4: Removing The Castings
Turn your mould upside down and begin to gently roll back the edge of the mould to start the release of your casting. I started with the letter M in the Victoria Mould and it’s leggy, delicate, and has wonderful details. Using the tip of the plastic tool to assist the removal, I gradually release the letter. (2:36)
Repeat steps 3 and 4 to spell out the words you’ve chosen for your wall art. Don’t forget to brush in cornstarch before you fill each impression with clay. I like to get all the letters completed before I begin gluing them to the project surface with the Titebond glue.
[Remember to keep the IOD Air Dry Clay safely zipped up in the ziplock baggie!]
STEP 5: Add Letters to Build Words
Carefully lay out the letters on your project surface to get the words where you want them. I like to take one letter casting at a time and apply the Titebond glue to the back with my fingertip before placing it back down and gently pressing.
Use a wet wipe or paper towel to remove any excess glue. Continue this process until your words are glued completely. Then let this dry 24 hours, minimum. I rubbed on some of the metallic paste to the letters to give them that pop the piece needed.
STEP 6: Embossing with a Stencil
At the end of the video, you’ll see what looks like a new craft project, but it’s a demonstration of using a stencil to add the Posh Chalk Metallic Paste. This technique and product will add depth and dimension to your mixed media piece.
I use a lacy floral stencil from the Tim Holtz Collection. In the video, I’m adding this to a wood tag that I’ve painted and used a bit of the Painterly Floral Transfer on. But check out the finished picture of my mixed media wall art piece - and you’ll see the embossing in the top right corner.
Here’s how I did it:
I lay the stencil across the project surface to apply the paste across the back of the stencil. The paste will fill in the stencil opening, but it’s important to apply carefully and wipe back or scrape the excess paste off.
Once you’ve covered the stencil, carefully lift it from the surface. Any excess paste can be removed with a paper towel. (7:13) I use some excess on my fingertip to rub along the corner edges of the piece, giving it more of a finished look.
Hint: The paste dries very hard, so it won’t smudge or come off when you’re done.
STEP 7: Getting The Depth
Alone, the metallic paste stenciled on the wall art looks great. But the next step will give you the interesting depth and texture that makes the piece stand out.
Grab a crafting heat gun and hold it back from the surface about 10” to a foot to apply the heat to the paste. Be careful not to get the heat on the transfer pieces, and make sure it’s not too close to the surface or the paste will bubble.

As the heat is directed to the paste, you’ll begin to see it puff up. (8:01) The metallic paste adds a hammered metal look to the surface - literally putting the mixed media into your project!
And you have now created a beautiful piece of wall art that will stand out in your gallery wall, fill in the perfect spot in your kitchen, or pop off a bathroom wall!
Go ahead and give this project a try. You’ll be amazed at how easy it is to master these techniques, and once you’ve got them down - the creative sky’s the limit! Don’t forget to send me pictures of your completed projects.

Easy DIY Project Using IOD Transfers: Perfect for Beginners

How to use Iron Orchid Design Products
How to use Iron Orchid Designs Decor Product
The popularity of our Iron Orchid Designs Decor products has been amazing. They fly off the shelves and have people wanting more. Sometimes in the excitement of it all we forget you might not have used these wonderful items before. There are tons of useful videos on the Iron Orchid Designs website. We will link some of them here.

Learn more about using Iron Orchid Design Stamps and Inks
Here is a great tutorial by the IOD gals on using the Pavo stamp along with some inks. Watch and see how the experts do it! "Do you remember using craft stamps and watercolors as a kid? Well, get ready to tap into your inner child and learn new ways to make art with stamps, inks
